Sunday, May 26, 2013

Dutch Honey Bread


In 1994, my mother-in-law made a book of recipes and favorite quotes in honor of what would have been her mother-in-law’s 100th birthday. She gave copies to her children and their families. I have glanced at it occasionally, but never made anything from it. I’m not sure why, but I would hazard a guess that recipes without detailed instructions were a bit intimidating 19 years ago. There probably are a few cooks and bakers who instinctively know how to do things in the kitchen. For the rest of us, a good teacher or plenty of practice may get us to that point.
This past weekend, I got a wild hair and pulled my copy off the cookbook shelf. After reading through it my younger daughter and I agreed the Dutch Honey Bread would be the first recipe we sampled. I did the usual read-through to make sure I had all ingredients, but I didn’t notice this recipe was “missing” a couple items. Eggs and salt aren’t mentioned. If you look carefully at the ingredients in baking soda, you will notice a type of sodium in the list. So leaving out salt isn’t a big deal. However, most of us aren’t used to making a quick bread without eggs. They help provide protein for structure in the loaf, as well as some of the liquid. I questioned the recipe for a moment, but since I already had most of the ingredients in the bowl, I decided to trust the recipe as written. According to the biography at the front of the book, my husband’s grandmother was an expert baker, so she must have known what she was doing. It’s also possible this recipe is very old. Before refrigeration, eggs were not something everyone had on hand all the time.
Now, this is particularly interesting to note. The majority of this recipe’s moisture comes from the sweeteners. You can try decreasing them if you like, but I wouldn’t recommend it. Like some of the other recipes I’ve posted, this should be considered a splurge. True, there is plenty of sugar, but here the indulgence is in cost. I’m sure others besides me have noticed that honey is getting expensive. Normally, I use it in smaller quantities (1/4 c. in yeast breads). To keep some of my baking costs reasonable, I buy honey and brown sugar at a membership club. (Pure maple syrup, too).
The anise seeds in this recipe will give the bread a subtle licorice taste. For those who don’t enjoy black licorice, try this recipe as written at least once for a touch of authenticity. Anise is apparently a very popular flavor in the Netherlands. I’ve noticed many products in Dutch import shops that contain it. (Black licorice, the most common, comes in many forms. Stay away from the double zout kind.)
1 tsp. Hot Water
1 ½ tsp. Baking Soda
1 tsp. Anise Seeds
1 c. Honey
1 c. Brown Sugar
1 tbsp. Butter
½ c. Water
½ c. Milk
3 c. All-purpose Flour (or half ratio of AP and whole wheat)
Preheat oven to 350°.
Place hot water, soda and Anise seeds in a small mixing bowl. Allow the soda to dissolve and the seeds to soften. Put the remaining liquids in a mixing bowl. After combining them, stir in the softened anise seeds and soda. Gradually add the flour. Mix until most of the lumps are gone. The batter can be divided into (2) 4” x 8” prepared loaf pans or (4) mini pans. For the large loaf pans bake at least 45 minutes. Mini loaves will need 25 – 30 minutes. Check the centers of the loaves with a toothpick. The bread is ready when the toothpick comes out clean.
The Project Queen

Monday, May 20, 2013

Summer Sunset Votive Holder


I haven’t been blogging for a full year yet, but this post is kind of a milestone. It’s my 50th. Perhaps a celebratory cake recipe might have been appropriate, but since the season of outdoor living finally seems to be here, I decided to showcase this votive holder instead. In my opinion, you can’t really enjoy an evening outdoors without plenty of candlelight.
This particular project is a 4.5 inch square glass container. If my memory is correct, I got it a few years ago for Mother’s day. I believe it contained an orchid. Alas, the orchid died a short time later. A couple of months ago I found the container when I was organizing my new plant shelf. Putting square mosaic tiles on it seemed like an obvious choice, especially if I could find iridescent or dichroic glass.
The tiles I chose are approximately .75 - 1 inch square. There are two different colors that were alternated. One is a coated dark glass, and the other is buff. While mosaic grout would have been appropriate and easier to use on flat surfaces, I used copper metallic Gallery Glass paint between the tiles, after the silicone sealer cured. It was easy to paint between the tiles with the bottle’s narrow tip. An added bonus? No special tools or cleanup afterward was required, plus the paint dries faster. To get good coverage with grout, it has to be spread over the tiles with a grouting tool then wiped off. Since the iridescent coloring of my tiles was a coating, rather than being fused into the glass, I didn’t want to risk damaging them.
This project was completed over a couple of days. It took 15 – 20 minutes at a time to glue the tiles to a side, and no more than 5 minutes to paint between then. Each side was allowed to dry before another one was done. This is probably obvious, but you will want your work surface to be horizontally flat. The container is laid on its sides to apply the tiles and paint.
A note about candles: While I do enjoy candlelight, and fire is supposedly man’s greatest discovery, I’m actually quite fond of battery-operated LED “candles”. You can get them in several different sizes now, and some even come with wax exteriors. Many flicker like candle flames. They are also much safer. If you forget to turn them off, the battery may die, but they won’t start a fire. My favorite application for them is putting them in containers with semi-transparent surfaces. Then you can’t tell the candles are fake. And since LEDs don’t generate heat, you’re not very likely to get burned if you need to touch the container.
The Project Queen

Wednesday, May 8, 2013

Gardenia Bud Vase


When we moved from Iowa to Texas thirteen years ago, it was summer. At the time I didn’t know my favorite spring-blooming bush didn’t grow here. The following spring I was a bit sad to learn Lilacs don’t like Texas.
However, I became acquainted with a family of plants I couldn’t grow up North. That would be the Jasmines. We had a Jasmine vine for a few years, until it got unruly and started creeping toward the house. Last year we bought some Gardenias. I don’t know why I wasn’t aware of their Jasmine relationship, but when one experiences their fragrance, the fact that Gardenias are Jasmines in bush form becomes quite clear.
A week and half ago, I was hemming a prom dress for a co-worker’s daughter. Prom dresses can be tricky to work with, and I needed a little pick me up. After studying the contents of my studio, my gaze fell upon a small green jar with a stoppered lid. It makes a great Gardenia bud vase. There is nothing like fragrant flowers to perfume a room. While I’ll always be nostalgic for Lilacs (my maternal grandparents had one in their yard), Gardenias make a very fine substitute.

Thursday, April 25, 2013

Hog Wild Runsas


A few weeks ago my husband and his hunting buddy went on a foray for wild hogs. They shot 2 decent sized sows. A few days later the friend showed up with 2 coolers worth of meat. At least half of it was ground, which takes plenty of work, and I do appreciate it. But I spent almost 4 hrs. one weekend morning packing it into smaller portions with the Food Saver. In case you think my husband got off easy, he had to make room in the already full refrigerator and chest freezers. We have since purchased the upright freezer I’ve been wanting. (Yeah!)
While it’s nice to have so much meat on hand, it doesn’t do any good if you don’t start using it. Which means I’m going to be getting very creative with wild hog. Especially the ground meat. You will probably be seeing many recipes containing it on this blog. So, where to start?
After staring at a recently purchased head of cabbage in my fridge, an idea came to me. It had been a couple of years since I made Runsas. Anyone who has spent time in the Midwest, Nebraska in particular, has possibly encountered a Runza Drive-in. I did partake of a few runsas while my husband and I lived in Lincoln as newlyweds. However, my exposure to a similar bun occurred during my childhood in Colorado. My mom made them. They were called cabbage pockets at our house. While I was in the middle of making this recent batch, I got curious and called my mom. I didn’t recall where she got her recipe. Turns out it was from my paternal grandmother. Funny, I don’t remember her making them. Not that she didn’t make delicious meals, but I usually looked forward to the homemade goodies she provided for dessert.
At any rate, cabbage pockets may have been a recipe Grandma inherited from her German mother. According to the cookbook “America’s Best Lost Recipes”, Runsas were brought to the Midwest by Volga Germans, ethnic German farmers who settled in Russia during the reign of Catherine the Great (that info was provided by my mom). I never heard that my great-grandparents were Volga Germans, so it’s possible cabbage and meat-filled buns went from Germany to Russia first. The afore-mentioned cookbook’s recipe for Runsas was one of the biggest reasons I bought it, besides being fun to read.
The dough recipe in this book contains sweetened condensed milk. I’ve made it as written, and it’s very good. Sadly, I had just used up the SCM for something else. For dough I went with my all-purpose standby, the rusk dough I used for the buttermilk cinnamon rolls (posted in March), using regular milk. Usually, runsas contain ground beef, but since they work just fine with most ground meats, feel free to use your favorite. The “Lost Recipes” version is different from my mom’s in 2 ways. It contains cheese and is made with white dough. My mom preferred whole wheat. As for the Runza versions, I don’t remember cheese, but they had several kinds on their menu.
I’m only going to submit the filling here. For anyone interested in the “America’s Best Lost Recipes” version, the book comes highly recommended, though it might take a bit more work to find it now. Its copyright is 2007.
Make the dough first. While it’s rising, you can make the filling.
1 ½ lbs. Ground Wild Hog
2 tbsp. Unsalted Butter
1 large Onion, diced
½ head of Cabbage, cored and chopped (3 c. approx.)
Salt & Pepper
Cheese of your choice (I used a combination of grated Dubliner and some slices of processed cheese, aka a store brand like Velveeta.)
Cook the ground meat in a large skillet until just beginning to brown. Make sure large chunks are broken up. Use a slotted spoon to remove the meat to a paper-towel covered plate. Drain off the liquid left in the skillet and return to the heat. Melt the butter and add the vegetables. Once the cabbage begins to soften, return the meat to the skillet. Season the mixture and add the cheese. Once the cheese is melted and incorporated in the filling, turn off the heat and set aside to cool a bit.
Heat the oven to 375°. To shape the buns get a cereal bowl large enough to hold 8-12 oz. Cover 2 sheet pans with parchment paper. Punch the dough down and turn it onto your work surface. Cut off portions the size of a baseball and roll in your hand until round. Place the dough in the bowl, and starting in the middle, press the dough along the bottom and up the sides. Be careful not to make the dough too thin at the bottom of the bowl. It will become the top of your bun. Place enough of the cabbage mix in the dough to fill it 2/3 up. Pull the edges of the dough over the filling and pinch in the middle. Remove the runsa from the bowl and place it on the baking sheet, seam side down. After the runsas are assembled, coat with spray oil and cover with a cotton kitchen towel, or cover with plastic wrap. Allow to rise about 20 min. Remove the covering and bake 20 min. or until golden brown. You may want to rotate the baking sheets half-way through for even browning. Before serving, the buns can be brushed with additional melted butter.
A note about yield: The cookbook recipe produces 8 buns. The rusk dough recipe I used produces a larger volume of dough. I got 11 runsas out of this batch. There was still some dough left that produced 5 sandwich rolls.
The Project Queen

Thursday, April 18, 2013

It’s a Vaahse!


Which means it’s a really nice vase, according to a certain commercial. In case you’re wondering where I found it, I got it as a freebie at work. Originally, it was a plain, glass cylinder vase.
Using my trusty aquarium sealer and gobs of flat glass decorator marbles it became a vaahse with a diagonal stripe pattern. I used clear, blue, light purple, pink and green marbles to make the pattern. Most of the stripes are 2 marbles wide. The last stripe is dark purple and 4 marbles wide. To establish the pattern, 2 marbles were set next to each other at the bottom of the vase. Continuing in the same color, the next row was offset by 1 to the left. Each row was offset by 1 to the left until they reached the top of the vase. The remaining stripes were set the same way until the outside surface was covered.
I wanted to fill in the gaps around the marbles but decided I didn’t want to try forcing mosaic grout between many round surfaces. I also wanted a less expensive and more interesting option. I used white tacky glue (which dries clear) that had a bottle tip which allowed me to squeeze the glue around the marbles. While the glue was wet, clear micro beads were sprinkled into it. (They can be found with glitter and other supplies for scrapbooking and card making.) I “grouted” a few rows between the marbles at a time, working the long way. The vase was laid on its side in a large storage container so I could keep the excess beads contained as much as possible. Once the glue was dry, gloss Mod Podge was applied to make the beads more secure. After it dried I did a few more rows until I worked my way around the vase.
Applying the marbles took a few days. I have to confess that filling in around them took longer and got a bit tedious. I like the finished result, however. Filling in the space around the marbles gave my vaahse a frosty look, and it just wouldn’t have seemed finished without the microbeads.
The Project Queen

 When I placed the arrangement in this vase, twigs with LED lights were included.
Then wouldn't you know it? I couldn't find the detachable plug.
For a few months I could only imagine what my idea looked like.
Well, this was my week for finding things when I wasn't searching for them.

Wednesday, April 3, 2013

Strawberry Granola


Pinterest can be a dangerous place for DIYers and the curious in general. I saw oven-dried strawberries, and found myself curious enough to try making them over Easter weekend. If the experiment succeeded I planned to make granola with them since strawberries are a particular favorite of my husband.
The first batch I attempted was made with a 1 lb. package of strawberries from a local farm stand. I did succeed in making my fruit completely dry, but I’m not going to lie about the yield. I got half a cup. I don’t consider the experiment a fail because I still got something that suits the end purpose, but I decided to save my precious local strawberries for fresh eating.
Before I go into an explanation of my solution, this is how I dried the fresh strawberries. I lined a rimmed half-size baking sheet with parchment paper. It not only keeps a sticky mess off your bake ware, it helps absorb some of the moisture. Instead of quartering, the berries were cut into 3-4 slices, 5-6 if they were large. Aim for the slices to be less than ¼” thick and be consistent as possible for even drying. Spread them around on the pan without touching. I have an oven with a convection fan, and I used it for this application. The directions I followed suggested 210°. Convection ovens will adjust themselves to be 25° cooler than conventional. I wanted 210° with the fan so I set my temp at 235°. The aim was to have dry fruit within 3 hrs. I checked it after 1.5 hrs. If smaller pieces were dry I removed them to a glass measuring cup. I made a point of rotating the pan when returning to the oven. At the 3 hr. mark the fruit was checked again. Don’t panic if some aren’t completely dry. Leave the oven closed, turn it off, and keep the fruit in it until cool.
Now, for the second batch… I used frozen strawberries. The actual drying directions are the same. However, there is step which must be completed before attempting oven drying. Place the strawberries in a fine mesh strainer, and put the strainer in a larger bowl. Allow the fruit to defrost overnight in your refrigerator. Frozen strawberries release a lot of liquid. You might get as much as a cup. (Save it for later.) Defrosted strawberries are very soft. You will need to cut them into quarters. They won’t be food magazine pretty before or after drying. But it won’t matter if they are put in something like granola, or you just don’t care about snacking on photo-ready food. Drying frozen fruit also works on blueberries. Leave whole and put into the oven while still frozen. Follow the same instruction for strawberries.
In case you google this process and find directions calling for salt, you won’t hurt my feelings if you try them instead. I didn’t use salt. Ours is a salt-conscious household, and it’s already in the granola recipe I use.
My favorite granola recipe originally came from Alton Brown. You can find it here: http://www.foodnetwork.com/recipes/alton-brown/granola-recipe/index.html. It’s easy to tweek. As a matter of fact, I’ve never made it exactly as written. It’s mostly a reference for quantities, to keep everything balanced.
Without further ado, here is the Strawberry Granola recipe.
3/4 teaspoon salt
½ c. strawberry juice (You can sweeten to taste before measuring and adding to granola)
3 cups rolled oats
1 cup almond pieces
1 cup pecans
3/4 cup shredded sweet coconut
1 cup dried strawberries (or ½ c. each strawberries and blueberries)
½ c. semi-sweet mini chocolate chips

Preheat oven to 250°.
I don’t get fancy or use separate bowls. The juice and salt go into the bowl first. After the salt dissolves, all ingredients except the fruit and chocolate are added. Stir until everything is mixed and well coated with the juice. Line 2 rimmed half baking sheets with foil. Spray the foil with cooking spray. Divide the granola between the pans, spread evenly across and spray again with the oil. Baking time is 1 hr., 15 min. If you’re like me and multi-task while baking, set the timer for 45 min. At that time give the contents of each pan a good stir and switch them to the opposite rack. Bake for 30 min. Allow the granola to cool, place in your favorite container, and stir in the fruit/chocolate. Enjoy it however you like. (In your breakfast bowl, on yogurt, as a snack…)

This granola is now my husband’s hands-down favorite (even over the chocolate-cherry I’ve made.) I must say it smells absolutely divine while baking. It just might be worth drying some fruit first.

The Project Queen

Sunday, March 31, 2013

The Peach Report, I

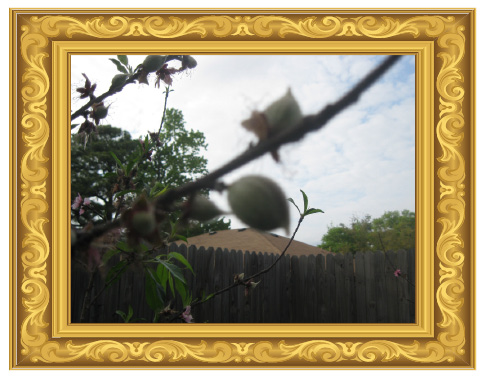
A little breeze started blowing every time I took a picture so the fruit closest to the lens is fuzzy.

A few days ago I got my answer about the pollination success of the early blooming peach tree. I discovered fruit on it while I was shooing one of the dogs from that area of the yard. (It’s fenced and supposed to be off limits.) To say I was excited would probably be an understatement. Some of the peaches are already bigger than the end of my thumb, and they seem to get a little bigger each day.
Until this point I haven’t really done anything special with my trees except to plant them with MiracleGro soil for trees and try to keep them watered. Since the rain is getting stingy again, I’m going to have to get back into the watering groove. Five gallon buckets with a hole in the bottom are a good way to water without straining restricted supplies. They will sit by the trees and be refilled as needed. Some grooming of the trees is needed too. There are suckers growing at the bottom which are probably from the grafted root stock, so they have to be pruned off. And most painful of all, I will have to remove some of the fruit. It’s necessary, though. The remaining peaches will be bigger and healthier.
One more thing I might try is covering my developing fruit with brown paper lunch bags. An article in an organic gardening magazine explained the benefits of the technique for growing apples without sprays. Since this is my first crop of peaches I figured experimentation early on isn’t going to hurt anything. If the bags keep my fruit bug and disease-free, and they continue to develop while covered, then I will have a strategy for growing organic fruit from the very beginning. Besides, a package or two of brown paper bags will be cheaper than chemical controls, organic or otherwise. After the growing season, the bags can be added to the compost container or mulched.
During the growing season for the peaches, I will give updates culminating in a harvest of the fruit. (Hopefully) Feel free to follow along and learn with me.
The Project Queen